When it comes to stretched or bar-type LCD displays, selecting the right resolution is far more nuanced than simply picking the highest number. Unlike standard 16:9 or 4:3 screens, the unique aspect ratios of these displays mean that resolution choice has a direct impact on UI design, image clarity, signal compatibility, and system integration. A poorly chosen resolution can lead to distorted images, unreadable text, and unexpected engineering work late in the project.
Choosing the right resolution for a stretched LCD display means matching the panel’s native pixel matrix with the active area, aspect ratio, UI layout, viewing distance, and host system output. A successful implementation depends on aligning the physical display shape with the signal source to avoid scaling distortion and maintain clear, usable content.
In stretched LCD module integration projects, we often see problems when resolution is treated as just another line on a datasheet. The reality is that for bar-type displays, resolution is a foundational design decision. A higher pixel count does not automatically create a better display if it forces awkward UI scaling, exceeds the bandwidth of the selected interface, or makes text too small for the intended viewing distance.
The key is to think of resolution as part of a complete display system. It must work with the physical active area, the content layout, the mainboard output, the display interface, and the mechanical structure of the final product. You can first explore bar type LCD modules and other LCD module types to understand the available module directions, then evaluate whether a standard stretched LCD or a custom module is the better fit for your project.
Resolution Is Not Only About Pixel Count
In standard displays, “higher resolution” is often used as shorthand for better image quality. For stretched LCDs, that logic is incomplete. The pixel count matters, but the way those pixels are arranged matters more.
For stretched LCD displays, resolution should not be judged by pixel count alone. A suitable resolution must match the display shape, aspect ratio, content layout, viewing distance, and system output capability. Otherwise, a higher-resolution screen can still produce poor readability or scaling distortion.
![]()
A bar-type display has a physical shape that is very different from a standard monitor. If the selected resolution does not match that shape, the content may be stretched, squeezed, cropped, or scaled in a way that reduces clarity. For example, forcing a standard 16:9 video signal onto an ultra-wide display without proper output settings can make circles look like ovals and text appear unnaturally wide1.
The practical goal is not to find the highest-resolution option. The goal is to choose a resolution that gives the content enough detail while fitting naturally within the panel’s native aspect ratio. For equipment projects, that usually means considering the display, UI, host board, and application environment together rather than evaluating the LCD module alone.
Start with Active Area and Aspect Ratio
Before comparing pixel counts, the first step is to define the physical space the display must fill. The active area is the visible part of the display. Its width and height determine the aspect ratio, and the aspect ratio determines how content can be arranged on the screen.
Active area and aspect ratio should come before pixel count. A 1920×360 display, a 1920×480 display, and a 1920×720 display may share similar horizontal resolution, but they provide very different vertical space and support different UI layouts.
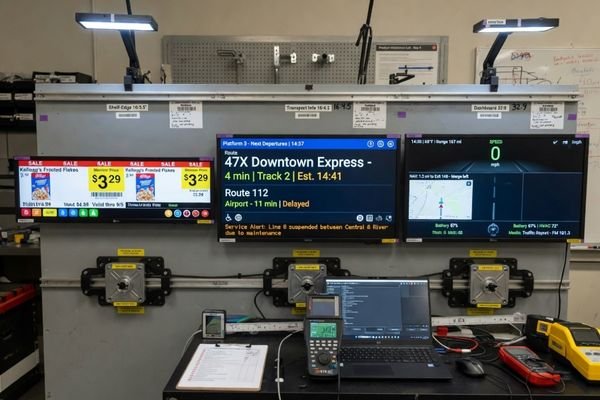
A long, narrow display used for a shelf-edge label has a different purpose from a wider stretched display used in a transportation information system or an equipment dashboard. The shelf-edge display may only need short text, icons, and simple pricing information. A transportation display may need route names, time information, warnings, symbols, and multi-zone layouts.
This is why aspect ratio is often the real starting point. Resolution defines the pixel matrix, but aspect ratio defines how the content fits. If the physical screen shape does not match the intended content layout, software teams may be forced to redesign the UI later, or the system may rely on scaling that reduces image quality.
For applications such as transportation systems, smart terminals, public information displays, and industrial control panels, the best resolution choice usually starts from the application layout rather than from a generic pixel target. Different equipment environments use stretched displays in different ways, so the resolution should follow the content structure and installation space.
Match Native Resolution, Input Resolution, and UI Design Resolution
One of the most common sources of trouble in stretched LCD projects is confusion between three different types of resolution. They sound similar, but they play very different roles in the final display result.
To avoid distortion, the panel’s native resolution, the mainboard’s input resolution, and the UI design resolution should be aligned as early as possible. A mismatch between these three is one of the most common causes of stretched images, blurry text, incorrect scaling, and unexpected layout problems.
 soft text, uneven graphics, or incorrect proportions2. In most stretched LCD projects, it is safer to define the native aspect ratio first, then design the UI and output signal around that target.
Choose Resolution Based on Content Type and Viewing Distance
The best resolution depends on what the display needs to show and how users will view it. A stretched display used for simple public information does not need the same pixel density as a close-range interactive dashboard.
Content density and viewing distance should define the practical resolution requirement. Simple text and status information may not need very high resolution, while detailed dashboards, maps, product images, and interactive layouts usually require more pixels and better vertical resolution.
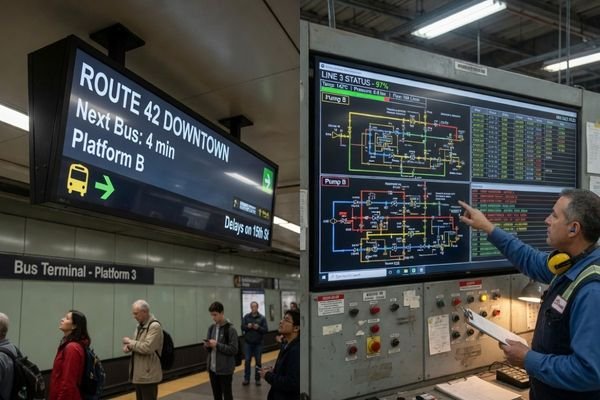
For example, a display on a bus showing route information or a ticker-style message may perform well with moderate resolution3. The text can be large, the layout is simple, and viewers may read it from a distance. In that situation, choosing a much higher resolution may increase cost and system requirements without improving the real user experience.
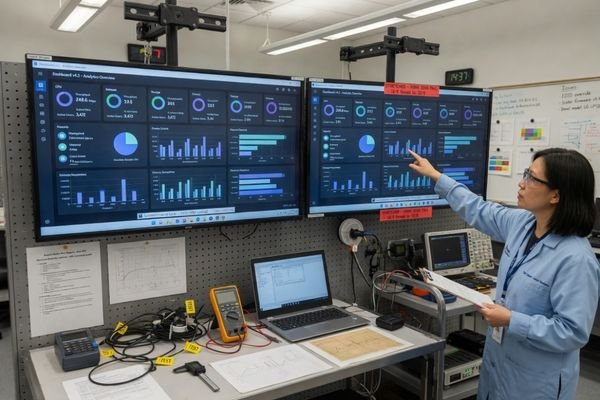
A different case would be an industrial dashboard viewed from close range. If the screen needs to show charts, warnings, small labels, icons, multiple information zones, or interactive controls, then more pixels become useful. The display needs enough vertical resolution to make text readable and enough horizontal resolution to separate information clearly.
A useful way to judge this is to separate the application into two broad conditions:
-
Low information density / long viewing distance: Route information, shelf labels, simple machine status, basic symbols, and ticker-style content. A lower or moderate resolution may be sufficient.
-
High information density / short viewing distance: Dashboards, detailed charts, product images, maps, multi-zone layouts, and interactive interfaces. A higher resolution and stronger UI planning are usually required.
In project discussions, we usually ask for example UI layouts or content sketches before recommending a resolution. Even a rough layout can reveal whether the project needs more vertical pixels, a wider aspect ratio, or a simpler content structure.
Check Mainboard Output and Interface Capability
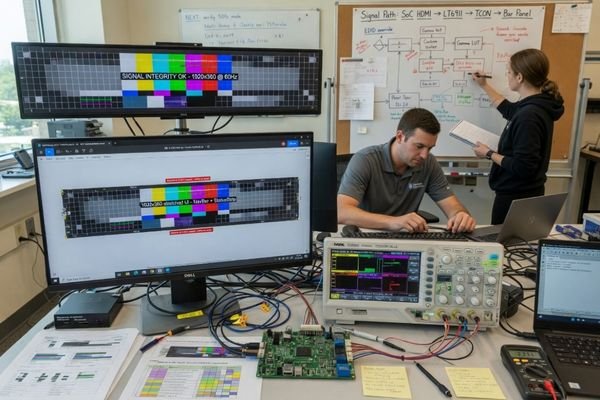
A stretched LCD module cannot be selected only from the panel side. It must also be supported by the host mainboard, graphics controller, operating system, scaler board, and display interface. This is where many stretched display projects become more complex than expected.
Before finalizing a stretched LCD, confirm that the host system can output the panel’s native resolution and timing. Non-standard resolutions may require custom display settings, EDID configuration, scaler support, or interface adaptation.
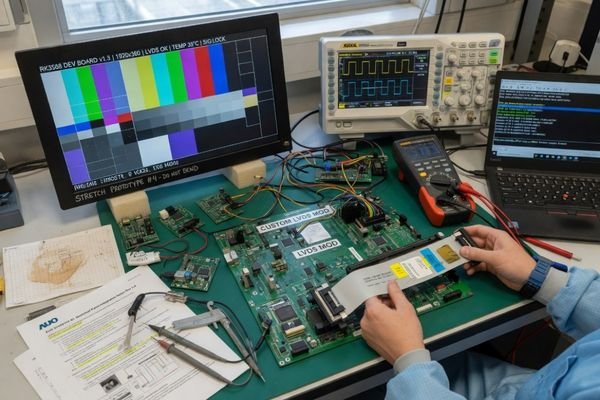
Many off-the-shelf mainboards are optimized for common formats such as 1920×1080 or 3840×2160. A stretched format such as 1920×360 or 1920×480 may not be available by default. In some systems, the graphics driver allows custom resolution settings. In others, the output may be locked to standard modes, or the system may require a scaler board to convert the signal.
For non-standard stretched LCD resolutions, we usually verify the host output, interface bandwidth, EDID behavior, timing support, and cable stability before recommending a configuration. This helps avoid late-stage situations where the display module is available, but the system cannot output the required resolution reliably.
Several technical details need to be checked early:
- Graphics output support: Can the chipset and driver generate the required non-standard resolution?
- EDID configuration: Can the display report the correct supported resolution to the host system?
- Interface bandwidth: Can HDMI, LVDS, eDP, or MIPI carry the target resolution, refresh rate, and color depth reliably?
- Timing compatibility: Does the panel timing match the controller board or mainboard output?
- Refresh rate requirements: Does the application need standard refresh behavior, or is a lower refresh rate acceptable?
- Cable and signal stability: Is the signal path stable enough for the selected interface and installation environment?
When these points are unclear, it is better to discuss your custom display project before the display module is locked. An engineering review can help confirm whether the selected resolution can be supported directly by the mainboard, or whether timing adaptation, interface matching, or scaler board configuration will be needed.
Avoid Scaling Distortion in Stretched LCD Displays
Scaling distortion is one of the most common visual problems in stretched LCD projects. It usually happens when the aspect ratio of the input signal does not match the native aspect ratio of the display panel.
The best way to avoid scaling distortion is to build the content pipeline around the panel’s native aspect ratio. UI design, mainboard output, and display resolution should be verified together before hardware and software decisions are finalized.
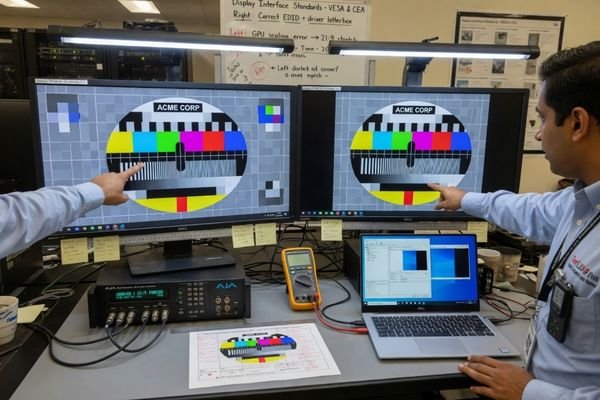
If a 16:9 signal is sent to a much wider bar-type display, the system has to decide how to fit the image. It may stretch the image horizontally, compress it vertically, crop the top and bottom, or leave unused areas. None of these results are ideal unless they are planned from the beginning.
The cleanest result usually comes from 1:1 pixel mapping4, where each pixel in the source signal maps directly to one physical pixel on the panel. This keeps text sharp, graphics accurate, and UI elements proportionate. It also reduces the risk of unexpected image behavior after system integration.
When a stretched image appears during integration, we usually look beyond the display panel first. Output resolution, operating system scaling, graphics driver settings, scaler configuration, and UI aspect ratio are often the real causes. Checking these items before changing hardware can save time and prevent unnecessary module replacement.
This is why hardware and software teams should not treat stretched LCD resolution as a late-stage display setting. The panel’s native aspect ratio should influence the UI canvas, the output resolution, and the signal path from the start. If the image already looks stretched, squeezed, or cropped during integration, the issue is often related to output resolution, scaling settings, or aspect ratio mismatch.
Common Resolution Patterns for Bar Type LCD Displays
Over time, several stretched LCD resolutions have become common because they match recurring application needs. These patterns are useful references, but they should not be treated as universal standards.
Common stretched LCD resolutions such as 1920×360, 1920×480, 1920×720, and 3840×1080 represent different aspect ratios and content possibilities. The right choice depends on active area, UI layout, viewing distance, source output, and mechanical integration.
| Resolution | Aspect Ratio | Typical Use Direction |
|---|---|---|
| 1920×360 | 5.33:1 (approx. 16:3) | Narrow information bars, public transport route displays, shelf-edge displays, and simple status information. |
| 1920×480 | 4:1 | Transportation information systems, industrial control panels, smart terminals, and equipment interfaces. |
| 1920×720 | 2.67:1 (approx. 8:3) | Wider UI layouts, detailed dashboards, multi-zone content, and control interfaces with more vertical information. |
| 3840×1080 | 3.56:1 (approx. 32:9) | Large ultra-wide information displays, transportation signage, industrial dashboards, and multi-zone equipment interfaces. |
These resolution patterns can help narrow the selection, but the final decision should come from the project constraints. A mechanically suitable display with the wrong resolution may still create UI or signal problems. A technically impressive resolution may also be unnecessary if the application only needs simple readable text.
When to Choose a Custom Resolution Stretched LCD Module
Standard bar-type LCD modules can be suitable for many projects. But when the active area, aspect ratio, interface, mechanical structure, UI layout, or lifecycle requirements do not match available standard modules, a custom resolution or custom stretched LCD configuration may be needed.
A custom resolution stretched LCD module should be considered when standard modules cannot match the product’s display shape, content layout, signal source, mechanical constraints, or long-term supply requirements. Customization is not only about changing pixel count.

Customization in this context usually means reviewing the complete display system. It may involve panel platform selection, timing review, controller board configuration, interface matching, backlight structure, cover glass integration, touch support, mechanical design, and lifecycle planning.
For projects with strict aspect ratio, interface, mechanical, or lifecycle requirements, our role is usually to help define the display module as part of the complete product system. This may include resolution review, interface matching, timing adaptation, controller board configuration, cover glass integration, and mechanical structure planning rather than selecting a display only by datasheet parameters.
For projects with strict resolution, interface, and mechanical constraints, our role is usually to help define the display module as part of the product system. That can mean checking whether a standard bar-type LCD can be adapted, whether the UI should be redesigned around a native aspect ratio, or whether a more customized LCD module structure is needed.
If your project requires a display shape or resolution that standard modules cannot support cleanly, custom LCD module engineering is usually a better starting point than forcing a standard display into a non-standard product structure.
Stretched LCD Display Resolution FAQ
Is higher resolution always better for stretched LCD displays?
No. Higher resolution can improve detail, but it can also increase interface requirements, scaling complexity, cost, and UI design difficulty. The best resolution is the one that matches the content, viewing distance, and system capability.
What is the best aspect ratio for a bar type LCD?
There is no universal best aspect ratio. The right choice depends on the available installation space, active area, content type, viewing distance, and UI layout.
Why does my stretched LCD image look distorted?
Distortion usually happens when the input resolution or UI layout does not match the panel’s native aspect ratio. The system may stretch, compress, crop, or scale the image incorrectly to make it fit the screen.
Should UI be designed at the native resolution?
In most stretched LCD projects, the UI should be designed around the panel’s native resolution or native aspect ratio. This helps reduce scaling loss, layout distortion, and unexpected image behavior.
Can a standard mainboard output non-standard LCD resolutions?
It depends on the mainboard, graphics controller, operating system, display interface, and timing support. Some systems support custom resolutions, while others may require EDID configuration, a scaler board, or engineering adaptation.
Conclusion
Choosing the right resolution for a stretched LCD display is a system-level design task, not a simple matter of choosing the highest pixel count. The resolution must match the active area, aspect ratio, content layout, viewing distance, mainboard output, interface capability, and scaling behavior. A successful project is one where the LCD panel, signal source, and UI design are aligned before the final module is selected.
Not sure which stretched LCD resolution fits your project? Start by defining the display shape, content layout, host output, and interface requirements. For projects that need a more integrated approach, our engineering team can help review the resolution path, signal compatibility, and customization options before the display module is finalized.
→ Start your custom display project
✉️ info@lcdmodulepro.com
🌐 https://lcdmodulepro.com/
-
Wikipedia. “Anamorphic format.” ↩
-
ScreenCloud. “Pixel Pitch and Viewing Distance: The Complete Guide.” ↩
-
Bitvisus. “Advantages of 1:1 Pixel-Mapping Controllers.” ↩