During product development, a stretched image is one of the most common LCD display module integration problems. Circles appear as ovals, text looks unnaturally wide or tall, and the user interface immediately feels unprofessional. Although the symptom is visually obvious, the root cause is usually not a panel hardware fault. In most integration cases, it is a configuration issue somewhere in the display signal chain.
A stretched image on an LCD display module usually indicates that the source output resolution, aspect-ratio handling, or scaling behavior does not match the panel’s native geometry. Effective diagnosis requires checking host output settings, aspect-ratio controls, and any active scaler in the signal path so the image is displayed with correct proportions.
Based on my LCD display module integration work at LCD Module Pro, I have seen many teams lose time by treating this as a panel problem or by changing display modes randomly. In practice, a stable stretched image1 is more commonly caused by software, firmware, or signal-path configuration than by the LCD panel itself.
A better approach is to diagnose the geometry step by step. Engineers should first identify how the image is being distorted, then compare the source format, panel-native resolution, aspect-ratio behavior, and any intermediate scaling stage. The primary goal is to determine whether the system is preserving native geometry or forcing a stretched output.
What Does a Stretched Image Usually Indicate in an LCD Display Module?
A stretched image is a clear sign that image geometry is being altered before the content reaches the panel in its intended form.
A stretched image on an LCD module usually indicates that the host system is outputting a format that does not match the panel’s native aspect ratio or active resolution, and that some part of the display path is resizing the image without preserving correct proportions.
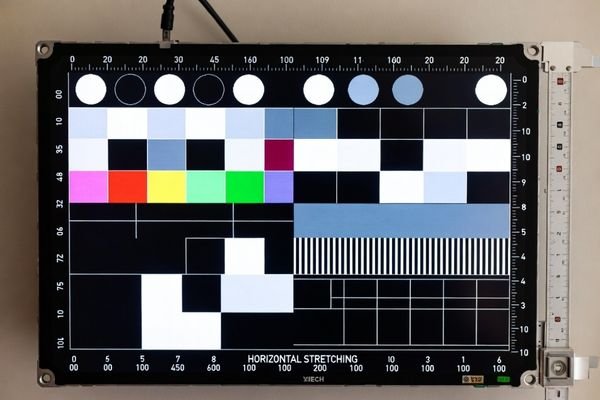
When I troubleshoot this problem in the field, the first thing I do is look at a test pattern with circles, square grids, and edge markers. The deformation pattern usually gives the first reliable clue about where the mismatch is happening.
Identifying the Source of Deformation
The first diagnostic step is to define the exact geometry error. Is the image stretched horizontally so everything looks too wide? Is it stretched vertically so objects look too tall? Is the distortion uniform across the full screen, or does it look like a more complex resize process? These observations help separate a simple resolution mismatch from a more specific aspect-ratio or scaler problem.
For example, if a 4:3 image is forced to fill a 16:9 panel without aspect-ratio preservation2, circles will become wide ovals. If the panel is 1280×800 but the system is configured to stretch 1280×720 content to full screen, the image may appear uniformly taller than intended.
Configuration Error vs. Hardware Defect
A consistently stretched image that is otherwise stable is usually a configuration issue, not a physical panel defect. The LCD panel displays pixels on a fixed physical grid. If geometry is wrong but the image remains bright, stable, and fully active, the distortion is more likely being introduced in the host output settings, graphics driver, operating system, scaler board, or firmware configuration before the signal reaches the panel.
Where Do Output Resolution Problems Usually Come From?
Output resolution problems usually come from the parts of the system that generate, select, or modify the display format before it reaches the LCD module.
In most projects, output resolution problems are caused by host processor settings, operating system display mode selection, graphics driver presets, board support package configuration, or firmware inside an intermediate driver board or scaler. The common result is that the panel receives a signal whose geometry does not match its native matrix.
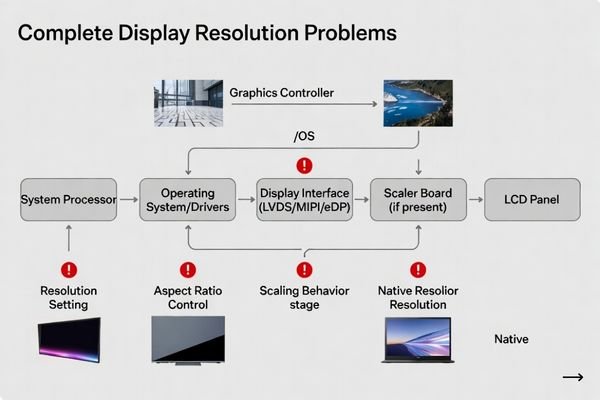
From an engineering standpoint, I usually trace the issue backward from the final image on the screen. The LCD module expects a signal that matches its native pixel grid, such as 1920×1080 or 1280×800. If it receives a different format, the system must either preserve the original image with unused borders or rescale it to fit. In many systems, the default behavior is to fill the screen, even when that distorts the image.
In embedded platforms, the output mode may be defined in the BSP, device tree, graphics driver, or display initialization code. A very common mistake is reusing a default configuration from another panel. For instance, a system may boot successfully using an 800×480 preset even though the actual LCD module3 is 1024×600. The image appears, but geometry is stretched because the source frame and the panel-native geometry do not match.
If an external driver board or scaler board is involved, the problem may also come from preset scaling behavior inside that board. That is why a reliable diagnosis should identify the exact stage where source geometry starts to differ from displayed geometry.
How Can You Tell Whether the Stretched Image Is Caused by Resolution, Aspect Ratio, or Scaling?
To diagnose this issue correctly, engineers need to separate three related but different causes: incorrect output resolution, incorrect aspect-ratio handling, and active image scaling.
These three causes can look similar on screen, but they are not the same problem. Incorrect resolution changes the source geometry, incorrect aspect-ratio handling forces the image into the wrong shape, and active scaling resizes the image somewhere in the signal chain, sometimes more than once.
Based on the projects I support with OEMs and system integrators, the fastest way to distinguish these causes is to use a test pattern with circles, square grids, and known aspect-ratio references. The way those shapes deform reveals what kind of processing is happening.
| Potential Cause | Visual Symptom on Test Pattern | Likely Root Cause |
|---|---|---|
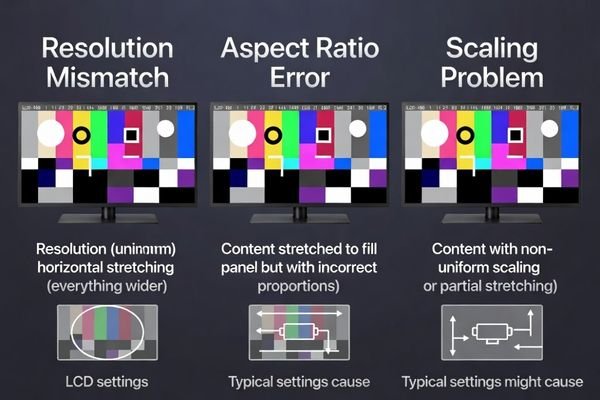
| Incorrect Output Resolution4 | Squares become rectangles and the entire image is uniformly distorted to fit the panel dimensions. | The host is outputting a resolution that does not match the panel’s native matrix. |
| Incorrect Aspect-Ratio Handling | The image fills the panel, but geometry is wrong because proportional scaling is not being preserved. | A “full screen” or “force panel” mode is overriding aspect-ratio preservation. |
| Active Image Scaling | Distortion may be less straightforward because one stage outputs Resolution A and another stage rescales it to Resolution B before the panel shows it. | A scaler in the host, OS, driver board, or graphics path is resizing the image. |
If circles become consistent wide or tall ovals, the issue is often resolution or aspect-ratio related. If the source image appears correct at one stage but stretched in the final output, a hidden scaler is a more likely cause. This distinction matters because each cause requires a different fix.
Which Technical Checks Matter Most When Diagnosing a Stretched LCD Image?
The most important checks are the panel’s native resolution, the actual host output mode, the aspect-ratio control settings, and the presence of any active scaling engine.
The key technical checks are to verify the LCD module’s native resolution, confirm the host output resolution, audit aspect-ratio settings such as “Preserve Aspect Ratio” or “Full Screen,” and identify whether any scaler in the signal chain is resizing the image before it reaches the panel.
When an engineer asks me how to isolate this problem quickly, I usually recommend a simple comparison between three things: the panel-native format, the source output format, and the final displayed geometry. That comparison solves most stretched-image problems because the mismatch is usually found in one of those layers.
Verifying Native Resolution and Output Mode
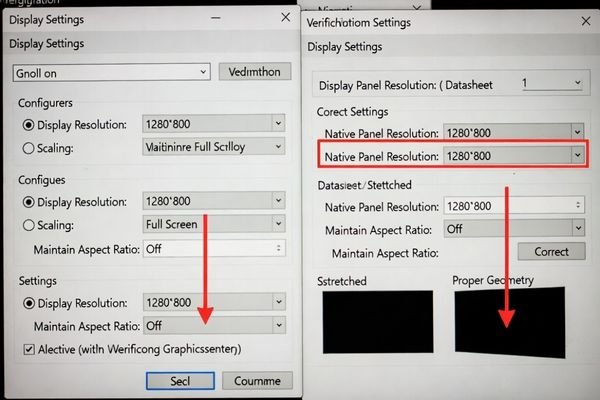
The first step is to compare the panel’s native resolution5 from the datasheet with the actual output mode configured in the host system. This means checking the exact resolution set in the operating system, application, graphics driver, boot logs, or embedded display configuration.
If the panel is 1280×800 and the host is outputting 1280×720, the problem is already visible at the format level. If the panel and host both report the same resolution but the image is still stretched, then the next step is to review aspect-ratio behavior and scaling rules rather than resolution alone.
Auditing Scaling and Aspect-Ratio Controls
If the source resolution looks correct, the next likely cause is image handling in the display path. Engineers should check for scaling options in several places:
- GPU or graphics driver: Settings such as “Preserve Aspect Ratio,” “No Scaling,” or “Full Panel.”
- Operating system display framework: Some systems apply scaling or screen-fit policies above the driver level.
- Driver board or scaler board firmware: Intermediate display boards may apply automatic full-screen stretch or preset output modes.
- Embedded configuration files: Device tree, BSP display nodes, or firmware settings may select a mode that changes geometry before the signal reaches the LCD module.
The core diagnostic question is simple: is the image being shown in native geometry, or is some layer forcing it to fill the screen?
What Is the Most Reliable Workflow for Fixing a Stretched LCD Display Module Image?
A reliable fix comes from documenting the distortion, isolating the responsible layer, and correcting one setting at a time.
The most reliable workflow starts with a test pattern, confirms the panel’s native geometry, checks the source output resolution, then audits aspect-ratio and scaling behavior across the signal chain. Each change should be made individually and validated immediately to confirm its effect.
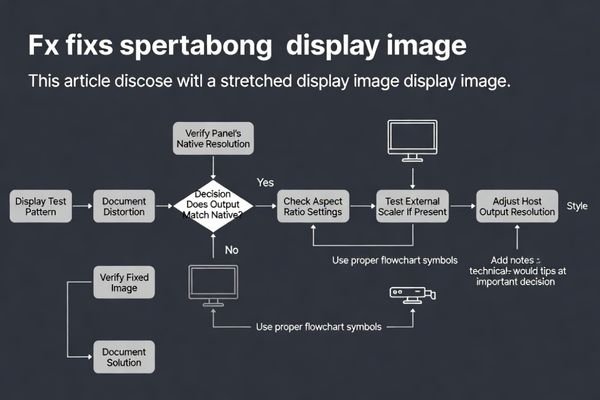
To solve this efficiently, I recommend a structured process that moves from observation to isolation and then to validation. This avoids random changes and helps engineers see exactly which setting caused the image geometry to return to normal.
Phase 1: Analyze and Document
Start by displaying a test pattern with circles, square grids, and known border geometry. Take a photo of the distorted image as the baseline. Then record the panel’s native resolution and aspect ratio from the datasheet. Next, document the current host output resolution and any display mode settings that are active.
At this stage, the goal is not to fix anything yet. The goal is to establish the mismatch clearly so the next change is based on evidence rather than guesswork.
Phase 2: Isolate and Correct
Change one variable at a time. First, set the host output to the panel’s native resolution whenever possible. If the geometry is still wrong, review aspect-ratio controls6 and disable any forced full-screen stretch. If an external scaler or driver board is present, try to bypass it or compare its input and output behavior separately.
After each change, recheck the same test pattern. Once the image geometry is correct, validate the result using real UI content, repeated boot cycles, and multiple content sources. A proper fix should remain stable under normal operating conditions, not just in one temporary test state.
FAQ
What is the first thing to check when an LCD module image is stretched?
The first thing to check is whether the host output resolution matches the panel’s native resolution and whether the image is being forced to fill the screen without preserving aspect ratio.
Can the image be stretched even if the display is working normally?
Yes. A display can be electrically stable and visually bright while still showing distorted geometry because of incorrect resolution mapping, scaling, or aspect-ratio settings.
Is a stretched image usually caused by the LCD panel itself?
Not usually. In most cases, the cause is in the host output settings, scaler behavior, driver board configuration, or graphics pipeline rather than in the LCD panel hardware itself.
How can engineers tell if scaling is the real cause?
Engineers can use a test pattern with circles and square grids. If the image fills the screen but geometric shapes are proportionally distorted, scaling or aspect-ratio handling is often the likely cause.
Why is aspect ratio important in stretched-image diagnosis?
Because even when the panel and source resolutions are both valid, incorrect aspect-ratio handling can still distort the image by stretching it horizontally or vertically to fill the screen.
What should be validated after fixing stretched output?
Engineers should validate the result using test patterns, real UI content, repeated boot tests, and multiple content sources to ensure the image proportions remain correct in all normal operating conditions.
Conclusion
Diagnosing a stretched image on an LCD display module is usually a signal-chain configuration task rather than a panel hardware problem. In most cases, the distortion is caused by mismatch between source resolution, aspect-ratio handling, and scaling behavior before the image reaches the panel. The most effective approach is to document the geometry error, verify the panel’s native resolution, compare it with the actual host output mode, and then identify where the image is being resized incorrectly.
At LCD Module Pro, I recommend treating stretched-image diagnosis as a structured integration workflow. When engineers work from a known test pattern, verify native geometry, and audit each stage of the display path carefully, they can solve distortion problems faster and reduce integration risk. A correctly proportioned image is a sign that the LCD module, host output, and signal path are working together as intended.
✉️ info@lcdmodulepro.com
🌐 https://lcdmodulepro.com/
-
Understanding the causes of a stable stretched image can help you troubleshoot and improve display quality effectively. ↩
-
Exploring aspect-ratio preservation can help you maintain image integrity and avoid distortion. ↩
-
Understanding LCD modules is crucial for troubleshooting display issues, as it helps in grasping how signals are processed. ↩
-
Understanding the impact of incorrect output resolution can help you troubleshoot and improve image quality in your projects. ↩
-
Understanding native resolution is crucial for diagnosing display issues and ensuring optimal image quality. ↩
-
Exploring aspect-ratio controls can help you understand how to maintain proper image proportions and avoid distortion. ↩