Choosing the right LCD display module for a kiosk involves more than picking a screen size. The deployment environment, user interaction patterns, and long-term reliability targets determine whether the kiosk stays readable, responsive, and serviceable for years—not just on the bench.
Define the environment first: ambient light, viewing distance, duty cycle, and enclosure thermal conditions. Then balance size and resolution for UI readability, choose an optical stack that controls reflections and smudges, and validate integration—interface, power sequencing, and ESD/EMI—to protect uptime in public deployments.
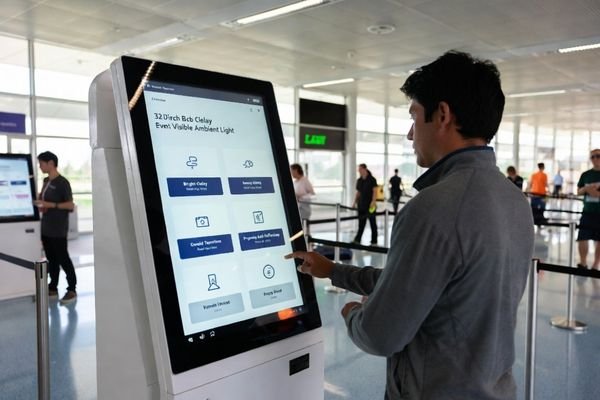
In LCD Module Pro customer projects, many kiosk programs stumble because the display is treated as a commodity instead of a system interface. A common example is selecting a standard 21.5-inch module that looks great in the lab, then becomes unreadable at the site due to glare from overhead lights or nearby windows. Another frequent issue is ignoring the thermal load1 inside a sealed enclosure, which can accelerate backlight aging under 24/7 operation.
These problems are usually preventable with a system-level approach. The goal is to match the module not only to the UI design, but also to the kiosk’s optical stack, enclosure mechanics, power behavior, EMI/ESD exposure, and service model. That starts with a clear definition of the real operating environment.
What kiosk environment and usage patterns should you define first?
Before reviewing any display specifications, translate the general term "kiosk" into measurable operating conditions that dictate performance and reliability requirements.
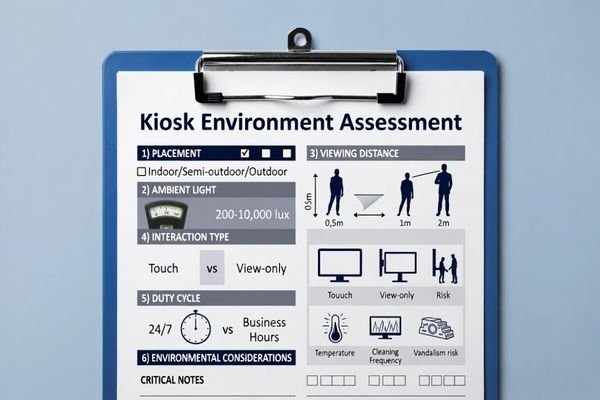
Define placement (indoor vs semi-outdoor), ambient light range, viewing distance, and interaction style. Then document duty cycle, cleaning/abuse risk, and enclosure temperature/airflow so you can prevent the most common field failures—unreadable content, premature backlight aging, and downtime from integration surprises.
When LCD Module Pro supports OEMs and system integrators, we start by building a mission profile for the kiosk display. This aligns stakeholders on what must be validated and prevents over-specifying features that do not improve real-world uptime.
Environmental and Lighting Conditions
The physical placement of the kiosk is the biggest driver. An indoor kiosk in a dim museum lobby has very different needs than a ticketing kiosk in a bright airport terminal. Define ambient light range (lux), identify glare sources such as windows and spotlights, and estimate the true operating temperature inside the enclosure. These inputs steer decisions on brightness, reflection control, and thermal strategy so the backlight and electronics stay within safe margins.
Usage Patterns and Physical Interaction2
User behavior matters as much as lighting. Will users stand close and fill forms, or glance from a distance? This determines viewing-angle needs and minimum legible font size. Define the duty cycle—24/7 or business hours—because 24/7 operation stresses the backlight and increases thermal exposure. Also document public-use risks: frequent touch, harsh cleaning chemicals, and potential impact or vandalism, which influence cover lens selection, sealing, and mechanical reinforcement.
How do size, resolution, aspect ratio, and UI readability trade off in kiosks?
In a kiosk, the ideal size, resolution, and aspect ratio are determined by readability at the intended viewing distance—not by the largest diagonal that fits the enclosure.
Choose size from viewing distance and the enclosure window, then match resolution to UI legibility (fonts, icons, touch targets). Confirm the aspect ratio supports the user journey. Avoid “spec wins” that force GPU scaling, blur text, or trigger late mechanical rework when portrait/landscape decisions come too late.

In OEM and integrator deployments, the best user experience3 feels effortless: text is readable at first glance and touch targets are easy to hit. A very high-resolution panel can backfire if the host must scale a lower-resolution UI, introducing blur that makes the interface look cheap. Conversely, too-low resolution can make text jagged and reduce perceived quality—especially for multilingual prompts and accessibility needs.
Aspect ratio is also a usability lever. Wider layouts can support step-by-step guidance and side-by-side content, while more square-like layouts can reduce scrolling and head movement for form-heavy screens. Finalize UI rules early—minimum font sizes, contrast targets, and touch target dimensions—before locking the module specification, because late changes often cascade into enclosure rework and schedule slips.
What optical and brightness choices keep kiosk content readable under real-world lighting?
To ensure readability, consider the entire optical stack—including brightness, reflection control, bonding, and coatings—and validate it under realistic lighting conditions, because reflections and fingerprints can degrade usability more than a moderate brightness deficit.
Perceived readability comes from the full optical stack, not brightness alone. Start with glare sources, then balance luminance, AR/AG treatments, and contrast at off-axis angles. Add smudge resistance for touch use, and validate with a real mock-up under representative lighting to avoid datasheet-only mistakes.
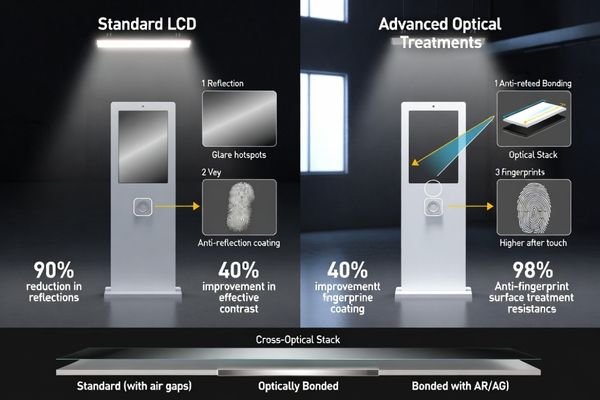
From an engineering standpoint, fighting ambient light is about managing reflections and protecting contrast. Simply increasing backlight brightness can raise power draw and heat, which may reduce lifetime if the enclosure cannot dissipate it.
| Optical Parameter | Engineering Consideration | Best Fit Scenario |
|---|---|---|
| Backlight Brightness | Higher brightness helps overcome ambient light but increases power and heat. | Valuable for high-ambient-light locations; may be unnecessary for controlled indoor environments. |
| Anti-Reflection (AR) Coating4 | Reduces surface reflections from external light sources, improving contrast. | Effective near windows or under strong overhead lighting. |
| Anti-Glare (AG) Treatment | Diffuses reflections, reducing mirror-like hotspots, but can soften perceived sharpness. | Useful when specular reflections are disruptive. |
| Optical Bonding | Reduces internal reflections by removing air gaps, improving contrast and robustness. | Often preferred in high-ambient-light deployments where reflection control is critical. |
| Smudge-Resistant Coating | Oleophobic treatment reduces fingerprint visibility and eases cleaning. | Recommended for interactive touch kiosks to maintain appearance and readability. |
We recommend building a physical mock-up and placing it in the intended environment. Viewing the prototype under real lighting—with realistic smudges and cleaning—reveals contrast and reflection issues far more reliably than spec sheets alone.
How do interface, timing, power, and reliability testing reduce kiosk integration risk?
Treating the LCD module as a subsystem with strict interface, power, and timing behavior—and validating it early—prevents the most common and costly kiosk integration failures.
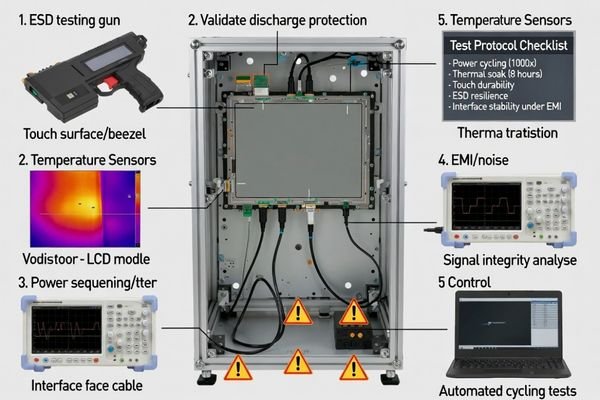
Confirm the host interface and timing early, then design for signal integrity with real cable lengths and EMI constraints. Validate power sequencing and brownout behavior for frequent power cycling. Run targeted ESD/thermal/vibration checks in the final enclosure to catch failures before mass deployment.
When field issues appear, they are often caused by integration gaps rather than a defective display. Random boot failures, flicker, or intermittent artifacts frequently trace back to marginal power sequencing, grounding paths, or electrical noise coupling inside the kiosk.
Interface and Power Integration
First, confirm the host controller’s native video output (e.g., LVDS, eDP, MIPI) and ensure timing alignment with the selected LCD display module. Last-minute adapter or scaler boards add cost, latency risk, and new failure points. Next, validate the power-on sequence: kiosks see frequent power cycles and occasional brownouts, so the module must initialize consistently. LCD Module Pro can help define a targeted validation plan based on best practices for public deployments.
Environmental and Use-Case Reliability
A kiosk is not a desktop monitor. It faces repeated human contact and public-space electrical stress. Validate ESD with the real bezel and cover lens so the discharge path and grounding strategy behave as designed. Run thermal soak tests5 with the module operating inside the sealed enclosure at representative brightness to confirm the system can manage heat. This is critical for protecting backlight stability and preventing premature dimming in long-duty-cycle deployments.
What LCD module options fit common kiosk scenarios, and how should you shortlist them?
A practical shortlist for a kiosk LCD display module begins with the user’s environment and uptime needs, then maps those to optical, electrical, and mechanical features that sustain long-term field performance.
From an engineering standpoint, there is no single "best" module for all kiosks. The right choice is the one that meets the deployment conditions without over-specifying cost drivers. The shortlisting process should be methodical.
-
Scenario 1: Indoor, Controlled Lighting (e.g., Museum, Lobby)
- Priorities: Stable viewing angles, consistent contrast, and an optical stack that resists fingerprints and cleaning haze. Brightness is secondary if glare is controlled.
- Module Profile: A module optimized for wide viewing and stable contrast, paired with a smudge-resistant cover lens strategy. Keep power and thermal load modest to extend service intervals.
-
Scenario 2: High Ambient Light / Semi-Outdoor (e.g., Airport, Retail Storefront)
- Priorities: Higher brightness and strong reflection control are mandatory. Thermal margin becomes a primary design constraint.
- Module Profile: A high-brightness industrial LCD display module combined with reflection-control treatments and, when needed, bonding strategies to reduce internal reflections. Verify enclosure thermal headroom at representative brightness levels.
-
Scenario 3: Specialized or Vandal-Prone (e.g., Public Transit, Outdoor Ticketing)
- Priorities: Durability, impact resistance, sealing strategy, and wide operating tolerance. Mechanical integration is as important as optical performance.
- Module Profile: Often best served by custom or semi-custom integration, including reinforced mounting, appropriate cover lens design, and shapes/aspect ratios that match the enclosure window.
In all scenarios, after defining optical and mechanical requirements, align the electrical interface with the host platform and assess lifecycle and EOL risk. For public deployments with long service lives, choose a supplier with clear change control, continuity planning, and validation support.
FAQ
Do kiosks really need high brightness, or is standard brightness enough?
It depends on ambient light and reflections. If the kiosk is near windows, under strong overhead lights, or in a semi-outdoor placement, reflection control and higher luminance become critical. Otherwise, you can often prioritize contrast stability, smudge resistance, and thermal margin over maximum brightness.
What is the biggest cause of a “screen looks washed out” in kiosks?
Most cases come from reflections, fingerprints, and internal optical interfaces rather than a panel defect. A better optical stack (e.g., with anti-reflection coatings or bonding strategies) and realistic lighting validation often solve the problem more effectively than simply increasing brightness.
How should I choose the interface between the host and the LCD module?
Start from the host’s native output and bandwidth, then verify timing compatibility, cable length limits, and EMI risk in the enclosure. Choosing an interface that matches the platform avoids last-minute converters that can add latency, blur, or reliability issues.
What kiosk-specific reliability tests are most valuable before mass production?
The highest ROI tests reflect public use: ESD with the real bezel/cover lens, thermal soak inside the enclosure, repeated power-cycling, and validation of touch/optical performance after cleaning and smudge exposure.
Does adding a cover lens or touch layer change the display performance?
Yes. It changes reflections, contrast, viewing appearance, and can affect EMI/ESD paths and serviceability. Decide the mechanical and optical stack early, and validate the complete assembly with a prototype to avoid late surprises.
When should I consider a custom LCD module for a kiosk?
Consider customization when the enclosure window is non-standard, the UI demands an unusual aspect ratio, the environment requires a specialized optical stack, or when lifecycle and service goals require tighter control over mechanical and electrical integration.
Conclusion
Choosing an LCD display module for kiosks is a risk-management exercise that balances user experience with long-term reliability. Start by defining real deployment conditions—ambient light, viewing distance, duty cycle, and enclosure thermal behavior—then select optics, mechanics, and interfaces that survive public use with minimal downtime. The most successful programs validate the entire integrated system, not the display as an isolated component.
At LCD Module Pro, we guide OEMs and integrators through requirement definition, shortlisting, and system-level validation—module, cover lens, enclosure, cables, and power behavior—before committing to production. This disciplined approach reduces integration surprises, supports lifecycle continuity, and helps deliver kiosk experiences that remain readable, responsive, and reliable long after installation.
✉️ info@lcdmodulepro.com
🌐 https://lcdmodulepro.com/
-
Exploring thermal load impacts can prevent issues like backlight aging, ensuring your kiosk operates efficiently. ↩
-
Exploring usage patterns helps in designing kiosks that enhance user interaction and durability. ↩
-
Explore this link to discover effective strategies that can significantly improve user experience in your projects. ↩
-
Explore how AR coatings enhance display visibility and contrast, especially in bright environments. ↩
-
Exploring thermal soak tests can help you grasp their significance in maintaining kiosk performance and longevity. ↩